So... as I was watching the live blogs of Apple's "Let's Rock" event this afternoon, I realized that, while I would love to blog on a daily basis, I lack both the time and the motivation to do so. This isn't to say that there will never be another blog entry here - if I have something valuable to post and the time to write it, I certainly will. However, with a full class load, working part time, and maintaining a house this year, my time seems entirely sapped by my day to day activities. On top of this, about 95% of the things I think to write about are variations on other bloggers' posts, and considering blogging is what some of these people do for a living, I generally feel that they cover topics better than I can with the limited amount of time I once had to write this blog.. so there's not a whole lot of motivation to be the 100th blogger to tell you about the new iPod nanos, touches, classic, etc.
Hopefully this blog was enjoyable for those who read it, and if I find the time and/or topics I feel the need to write about, this will be the place I go. Just file techtelic into the back of your RSS reader, and hopefully there will be a time where this blog will continue.
Thanks for reading!
Tuesday, September 9, 2008
Tuesday, August 5, 2008
Stuff I Use: Simplify Media
Having multiple computers can become a major issue with different versions of documents and files on each computer. Most people have at least two if not more computers between home and work. As a computer tech, my work computer changes more often than most. I like to have at least some of my multimedia collection with me so that I can listen to music or have a movie on in the background as I work, but transferring this data from one computer to another and keeping track of what media is where is a time consuming and annoying task that I'd rather just not deal with.
The solution I've found is a program called Simplify Media. It allows users to share all of my media on a computer at home, and allows users to access that media from any other internet connected computer. Most solutions this versatile require a decent amount of technical knowhow such as opening ports on your router or hosting the files online, but Simplify Media allows users to access any file in iTunes on a home computer as if it were shared on the local network at work, and does it simply and easily.
The program does not allow users to modify or create new playlists from the remote machine, but all of the normal abilities users have with shared libraries apply for libraries shared via simplify media. To get started, simply create an account with Simplify Media http://www.simplifymedia.com/, download the free application (Mac or Windows) on each computer you'd like to share media on, and sign in with iTunes open on each computer. Simplify media will automatically connect users with other computers that the user has approved to share media. This will allow access to any media in your iTunes library from any remote machine you approve.
Monday, July 14, 2008
Point & Shoot Shootout, The Perfect Camera to Buy and Why
About a month ago, I realized that the case on my Canon SD800 IS camera was coming a bit loose. I figured that it was just from such heavy use as my daily camera for over two years, but didn't do anything to fix it. That turned out to be a bad idea, because dust was able to get into the camera through the loose case, and each picture I took had nice bits of dust captured along with the rest of the image. This basically ruined every picture, freckling each with little dark spots all over the place, so I decided it was time for an upgrade.
I searched the web and my local camera stores for the best replacement, but first I had to figure out what is most important to me for a point and shoot camera.
These things are:
•Speed
•Ease of Use
•Small Size
•Crisp Pictures, both indoor and out
•Video Quality
These qualifications won't fit every user, but as a secondary camera to my D80, and as something that has to fit comfortably in my pocket, these requirements were fitting. Here are a few cameras that I came up with that fit these specifications and would be sufficient to replace my beloved SD800.
Canon PowerShot SD1100 IS
Nikon CoolPix S600
Sony CyberShot DSC-T2
Samsung NV24 HD
Each of these cameras had their advantages, but I ended up with the Canon SD1100 IS because it fit my requirements almost perfectly. Second place was the Nikon S600, but as I will explain, it didn't meet my qualifications as well as the Canon SD1100, not to mention that it is $50 more expensive.
As for the others...
The Sony had the same issues that Sony cameras had when I was purchasing my SD800 IS, namely inaccurate white balance. Sony makes great cameras, and the shots they take are decent for the most part. However, in my experience, the point and shoot cameras lack the brilliant and accurate colors that Canon's are known for. In my brief in store testing with the DSC-T2, the SD1100 outperformed this smaller, lighter camera, offering more consistent, clearer images with more accurate color.
The Samsung turned out to be a one trick pony, although its trick is a very cool one - 720p high definition video recording. I take a surprising amount of video with my digital cameras, and I couldn't get my hands on a demo model, but other reviewers have commented on its lack of consistent image quality while taking regular photos as well as lack of speed. Both of these drawbacks held this from being my camera of choice as well.
But now onto the top two, and why I ended up with the Canon over the higher spec'd Nikon.
First, the SD1100 is quick. When a friend is laughing hysterically with blue icing all over his teeth, I want to be able to pull my camera out and capture the moment quickly and clearly, so speed is a necessity. A quick stopwatch timing shows that the camera takes a bit over a second and a half from completely off to taking a picture with no flash. The SD1100 also manages to keep up between shots, taking less than a second between each to snap a second, third, fourth, fifth, and sixth picture, all within five seconds of the initial shot. The Nikon competitor advertises that it's "stunningly fast," and it's definitely quicker than most cameras I've used at about one frame per second continuous shooting. However, the Canon struck me as quicker from the start and boasts a slightly quicker 1.3 fps spec.
The ease of use was also a huge detractor from the Nikon where the Canon excelled. Granted, ease of use is a subjective judgement and I've owned and used a Canon almost exclusively for almost two years, but my first two cameras were Nikon point and shoots, so, in theory, both should be equally intuitive for me. Canon seems to have further refined their user interface into a smooth and logical way to operate the camera whereas the Nikon seemed to be more complicated and more difficult to figure out. For example, switching the camera from shooting mode to video mode is a simple slider on the back of the Canon, where the nikon requires going into the modes menu, rotating the selection ring, settling on the video shooting mode, and then pressing okay. Overall, the Canon seemed much more logical in its button layout and was simpler to use.
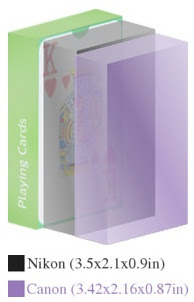
The Canon and Nikon are within .2 in all dimensions and weight, so for all logical comparisons, the two are the same size. Both are smaller than the SD800 IS and felt about the same in my pocket. The Nikon was .2 oz heavier, but that's a miniscule difference and wasn't enough to make a decision based on weight alone.
Here's a comparison of the Canon (purple) and Nikon (black) against a pack of playing cards:
What digital camera are you using, and what do you like/dislike about it most? Post in the comments!
I searched the web and my local camera stores for the best replacement, but first I had to figure out what is most important to me for a point and shoot camera.
These things are:
•Speed
•Ease of Use
•Small Size
•Crisp Pictures, both indoor and out
•Video Quality
These qualifications won't fit every user, but as a secondary camera to my D80, and as something that has to fit comfortably in my pocket, these requirements were fitting. Here are a few cameras that I came up with that fit these specifications and would be sufficient to replace my beloved SD800.
Canon PowerShot SD1100 IS
Nikon CoolPix S600
Sony CyberShot DSC-T2
Samsung NV24 HD
Each of these cameras had their advantages, but I ended up with the Canon SD1100 IS because it fit my requirements almost perfectly. Second place was the Nikon S600, but as I will explain, it didn't meet my qualifications as well as the Canon SD1100, not to mention that it is $50 more expensive.
As for the others...
The Sony had the same issues that Sony cameras had when I was purchasing my SD800 IS, namely inaccurate white balance. Sony makes great cameras, and the shots they take are decent for the most part. However, in my experience, the point and shoot cameras lack the brilliant and accurate colors that Canon's are known for. In my brief in store testing with the DSC-T2, the SD1100 outperformed this smaller, lighter camera, offering more consistent, clearer images with more accurate color.
The Samsung turned out to be a one trick pony, although its trick is a very cool one - 720p high definition video recording. I take a surprising amount of video with my digital cameras, and I couldn't get my hands on a demo model, but other reviewers have commented on its lack of consistent image quality while taking regular photos as well as lack of speed. Both of these drawbacks held this from being my camera of choice as well.
But now onto the top two, and why I ended up with the Canon over the higher spec'd Nikon.
First,
 the SD1100 is quick. When a friend is laughing hysterically with blue icing all over his teeth, I want to be able to pull my camera out and capture the moment quickly and clearly, so speed is a necessity. A quick stopwatch timing shows that the camera takes a bit over a second and a half from completely off to taking a picture with no flash. The SD1100 also manages to keep up between shots, taking less than a second between each to snap a second, third, fourth, fifth, and sixth picture, all within five seconds of the initial shot. The Nikon competitor advertises that it's "stunningly fast," and it's definitely quicker than most cameras I've used at about one frame per second continuous shooting. However, the Canon struck me as quicker from the start and boasts a slightly quicker 1.3 fps spec.
The ease of use was also a huge detractor from the Nikon where the Canon excelled. Granted, ease of use is a subjective judgement and I've owned and used a Canon almost exclusively for almost two years, but my first two cameras were Nikon point and shoots, so, in theory, both should be equally intuitive for me. Canon seems to have further refined their user interface into a smooth and logical way to operate the camera whereas the Nikon seemed to be more complicated and more difficult to figure out. For example, switching the camera from shooting mode to video mode is a simple slider on the back of the Canon, where the nikon requires going into the modes menu, rotating the selection ring, settling on the video shooting mode, and then pressing okay. Overall, the Canon seemed much more logical in its button layout and was simpler to use.
The Canon and Nikon are within .2 in all dimensions and weight, so for all logical comparisons, the two are the same size. Both are smaller than the SD800 IS and felt about the same in my pocket. The Nikon was .2 oz heavier, but that's a miniscule difference and wasn't enough to make a decision based on weight alone.
Here's a comparison of the Canon (purple) and Nikon (black) against a pack of playing cards:

Canons are best known for their abilities to capture amazing color and crisp lines in outdoor shots. The shot below, for example, was taken with my SD800 IS. My experience with prior Nikons was that they took fine pictures, but just lacked the definition that the Canons had. I read many reviews of both cameras to find any caveats that I may have missed during my testing. There were a few reviewers who noted that the Nikon took great pictures, but that they were "soft," where the Canon produced much more vivid images.
Both cameras pack optical image stabilization/vibration reduction which help with motion blur and shaky hands, but considering the Nikon takes soft images even in near perfect conditions, the Canon was definitely the winner here as well.


As 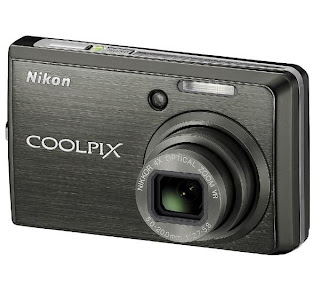 for video quality, both the Canon and the Nikon have the same video resolution and both utilize the optical image stabilization during recording. Neither camera was able to use optical zoom during video recording, but the digital zoom on the Canon was a smooth zoom whereas the Nikon had a choppy, incremental digital zoom. The audio on both seemed about the same as well, so the cameras tied this category.
 for video quality, both the Canon and the Nikon have the same video resolution and both utilize the optical image stabilization during recording. Neither camera was able to use optical zoom during video recording, but the digital zoom on the Canon was a smooth zoom whereas the Nikon had a choppy, incremental digital zoom. The audio on both seemed about the same as well, so the cameras tied this category.
Now, 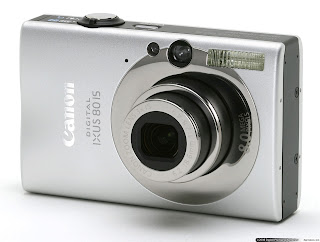
while the Canon won all of these comparisons, all while maintaining a $50 less expensive price point, you do get a few worthwile things for your money with the Nikon. First is a superior zoom, which is both wider angle and longer telephoto than the Canon's. This means that you can be closer to your subject and further zoomed out, or further from you subject and zoomed in closer than the Canon would be able to. The second thing is a marginally larger screen at .2" bigger, and while that may not seem like a huge amount, when it's 2.5" vs 2.7", there is a definite advantage to the larger screen. The Canon's superior user interface and vivid colors won me over, but Nikon has really improved their consumer cameras and I feel that the S600 would make for an extremely fine camera for a user that desired these features.

while the Canon won all of these comparisons, all while maintaining a $50 less expensive price point, you do get a few worthwile things for your money with the Nikon. First is a superior zoom, which is both wider angle and longer telephoto than the Canon's. This means that you can be closer to your subject and further zoomed out, or further from you subject and zoomed in closer than the Canon would be able to. The second thing is a marginally larger screen at .2" bigger, and while that may not seem like a huge amount, when it's 2.5" vs 2.7", there is a definite advantage to the larger screen. The Canon's superior user interface and vivid colors won me over, but Nikon has really improved their consumer cameras and I feel that the S600 would make for an extremely fine camera for a user that desired these features.
What digital camera are you using, and what do you like/dislike about it most? Post in the comments!
Sunday, July 13, 2008
Stuff I Use: Keyboard Maestro
The  newest generation of both desktop and notebook Apple keyboards have nifty media controls built into their layout. Simple play/pause, track forward, and track backwards keys may seem like trivial additions to the previous keyboard layout, but when you want to quickly skip a track you've heard a million times or repeat a track you love, it makes a huge time difference to have these keys handy as opposed to switching to iTunes and switching or pausing the song that way.
For those of us wanting the ability to use these quick keys, but have slightly older Apple computers, there is a program called Keyboard Maestro that allows users to assign key mappings that would otherwise be impossible without upgrading to newer hardware. The program is very simple to use and allows for keys to be mapped to various functions including application launching, running scripts, application control, and assigning keyboard shortcuts to menu commands in various applications.
My main use for Keyboard Maestro is to replicate the media control keys on the newer Apple keyboards. I use my F6 key for play/pause and my F7 key for track forward. F5 is used by volume up and F8 is used for spaces (although I rarely use spaces that way,) so those aren't up for direct use, but these two work well to get my keyboard functionality close to the way I want it.
Keyboard Maestro also helps to replicate some functionality from OS9 that I've been missing; keyboard application launching. In OS 9.2 I had my keyboard set up so that F1-F4 launched all the applications I used on a daily basis, and while OSX has made application launching a much more simple task, it's hard to beat the speed that a single button launch command offers. I now use F1 to launch iTunes, iChat, Apple Mail, and Safari with just one keystroke.
One last comment is that if you're on an Apple notebook, the function keys are mapped to various functions such as volume, screen brightness etc, so you have to either hold down the function key while pressing the keys you mapped or change the "Use all F1, F2, etc. keys as standard function keys" preference in the keyboard and mouse section of system preferences in order for your new mappings to work.
A free demo is available from the developer's website
Wednesday, July 9, 2008
3G iPhone, Can it Match The Hype of The First?
I was an apple employee when the first iPhone was released, and I can say that the device lived up to 95% of the hype. The first time I held the so called "Jesus phone" in my hand, I had an exuberant death grip on the new gadget, not wanting to give it up until I had played with every last feature. I was entirely overwhelmed by all the amazing things the iPhone could do, and thought it was the answer as far as a phone/iPod combination. Just as an iPod/phone replacement, I would have bought one, but Apple managed to add a slew of other features (including an amazing web browser,) sweetening the deal. I was extremely anxious to get my hands on one of my own.
However, I find myself completely unexcited about the iPhone 3G. There are a few reasons for this. First, the new iPhone doesn't offer any new revolutionary hardware features from the first; second, the price is misleading, and will ultimately cost consumers more; and third, a loss of the overlooked, but very important at home activation.
My "old" edge iPhone will get all the new software features, including application support. These new software features are the most important improvements between the original iPhone and the new 3G for this writer, and with wifi at my home, my work, and most friends houses, the new hardware supporting 3G really isn't that important. GPS is cool, but I already have a dedicated GPS device that stays in my car and is available whenever I might need it -- not to mention that if I receive a phone call while the GPS is navigating, it will continue to work normally without interruption.
In two days, the second coming of the iPhone will hit store shelves, and for half the price of the original! To me, Apple has gone against what they originally set out to do with the iPhone, and that is to make it worth something. Most cell phones have gotten to the point that they are almost disposable. The cell phone carriers subsidize their phones to sell phone service, and one of Apple's goals was to have an unsubsidized device. Obviously, they have given up that goal. I'm sure that's a sound business decision, and at the same time the consumers are paying a smaller initial price, but over the life of the iPhone, the increased cost of the data/voice plan will cause consumers to end up shelling out $160 MORE than they did over the life of the original iPhone.
The third thing is a bit less important, but is still something that was lost from the first iPhone -- at home activation. The original iPhone was the easiest phone to buy because you didn't have to open it in the store and activate it with the carrier. Instead, you just bought the phone, and took it home like any other device to be activated with your computer at home. On top of the fact that you could do it at home, the activation process was a lot easier and only required you to plug your phone in and have iTunes installed. The program recognized the iPhone and walked you through a very simple activation process. The new iPhone will require in-store activation, and while I'm sure Apple has figured out a way to streamline the process, it still won't be able to match up to the ease of the original.
I'm leaving out the little things like the fact that the iPhone's GPS will be UNABLE to provide turn by turn directions and that the battery life is significantly less than the original's (by 3 hours of data use), but at this point I'm just nitpicking and ignoring the positive things like the fact that users can now use data and voice at the same time or that web access will, in fact, be much faster.
I think I've ranted enough, but the new iPhone's lack of revolutionary new features (not that there was much to improve), the increased overall price (and the misleading tagline), and loss of at home activation just aren't encouraging reasons to upgrade.
 was an apple employee when the first iPhone was released, and I can say that the device lived up to 95% of the hype. The first time I held the so called "Jesus phone" in my hand, I had an exuberant death grip on the new gadget, not wanting to give it up until I had played with every last feature. I was entirely overwhelmed by all the amazing things the iPhone could do, and thought it was the answer as far as a phone/iPod combination. Just as an iPod/phone replacement, I would have bought one, but Apple managed to add a slew of other features (including an amazing web browser,) sweetening the deal. I was extremely anxious to get my hands on one of my own.
However, I find myself completely unexcited about the iPhone 3G. There are a few reasons for this. First, the new iPhone doesn't offer any new revolutionary hardware features from the first; second, the price is misleading, and will ultimately cost consumers more; and third, a loss of the overlooked, but very important at home activation.
My "old" edge iPhone will get all the new software features, including application support. These new software features are the most important improvements between the original iPhone and the new 3G for this writer, and with wifi at my home, my work, and most friends houses, the new hardware supporting 3G really isn't that important. GPS is cool, but I already have a dedicated GPS device that stays in my car and is available whenever I might need it -- not to mention that if I receive a phone call while the GPS is navigating, it will continue to work normally without interruption.
In two days, the second coming of the iPhone will hit store shelves, and for half the price of the original! To me, Apple has gone against what they originally set out to do with the iPhone, and that is to make it worth something. Most cell phones have gotten to the point that they are almost disposable. The cell phone carriers subsidize their phones to sell phone service, and one of Apple's goals was to have an unsubsidized device. Obviously, they have given up that goal. I'm sure that's a sound business decision, and at the same time the consumers are paying a smaller initial price, but over the life of the iPhone, the increased cost of the data/voice plan will cause consumers to end up shelling out $160 MORE than they did over the life of the original iPhone.
The third thing is a bit less important, but is still something that was lost from the first iPhone -- at home activation. The original iPhone was the easiest phone to buy because you didn't have to open it in the store and activate it with the carrier. Instead, you just bought the phone, and took it home like any other device to be activated with your computer at home. On top of the fact that you could do it at home, the activation process was a lot easier and only required you to plug your phone in and have iTunes installed. The program recognized the iPhone and walked you through a very simple activation process. The new iPhone will require in-store activation, and while I'm sure Apple has figured out a way to streamline the process, it still won't be able to match up to the ease of the original.
I'm leaving out the little things like the fact that the iPhone's GPS will be UNABLE to provide turn by turn directions and that the battery life is significantly less than the original's (by 3 hours of data use), but at this point I'm just nitpicking and ignoring the positive things like the fact that users can now use data and voice at the same time or that web access will, in fact, be much faster.
I think I've ranted enough, but the new iPhone's lack of revolutionary new features (not that there was much to improve), the increased overall price (and the misleading tagline), and loss of at home activation just aren't encouraging reasons to upgrade.
UPDATE: Looks like my concerns about the new in-store activation were just about right. iPhonealley.com has published an article quoting apple's VP in charge of retail, "Our expectation is that in 10 to 15 minutes, you'll be set up and ready to go,'' iPhone alley adds that [10 to 15 minutes] is significantly slower than the launch last June, which took only about 3 minutes per person to quickly go in, make the purchase, and leave.
Monday, June 30, 2008
To an 160 GB iPod Classic from a 60 GB iPod Video
Up  until a month ago, I had been using a 5th generation 60 GB iPod video. It served all the purposes I needed it to, except that I had over 60 gigs of music alone, and I wanted to store photos and videos on the iPod as well. When I had the money to buy a higher capacity iPod, I sold my iPod Video right before Apple's annual World Wide Developer Conference (WWDC), hoping that a new iPod might be announced at the event. No new iPod was announced, but I had already sold my Video, so I went out and bought a new 160 GB iPod Classic.
What I was expecting was nothing more than my old iPod with a higher capacity. What I got was a lot more than that. The new iPod offers a slew of small touches, both on the hardware and on the firmware running on the device.
The advantages on the hardware side are that the screen is brighter and crisper, the battery life is more than twice as long, and the iPod still manages to stay the same size while more than doubling capacity. On my older iPod Video, the screen had a high enough resolution to display the important items, but the newer screen is both brighter and higher resolution, allowing more information to be displayed on the screen at once. As for battery life, my Video stopped at around 12 hours of playing music, but the new Classic will play it for 30 hours. On top of all that, the dimensions of the devices are almost identical, other than the shape of the front edge is shaped slightly differently.
The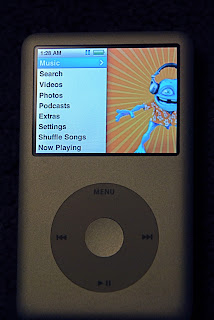 firmware improvements include a better method of displaying the time in the top menu bar, artist names listed under song names while viewing playlists, and an overall sleeker and more appealing look and navigation through my media. On the Video, the top menu bar was usually taken by the name of the playlist or navigation menu you were in, so trying to check the time in the top bar was a time consuming process. The newer firmware takes advantage of the higher resolution screen and displays the time constantly, regardless of what menu you're in. Another slight annoyance I had with the Video was that many artists have songs with the same name (for example, I have 9 different songs, all called "beautiful" and all by different artists). If these songs were in a playlist, I wasn't sure which of the songs I was choosing. Again taking advantage of the higher resolution display, the Classic displays the artist of each song when looking at a playlist. Lastly, the Classic really utilizes album art that is tied to the songs in my library. At each music menu, the menu options are on the left side of the screen while albums that are in the current selection are faded in and out on the right. This often provides me with something random but good to start listening to and makes for an interesting way to pick music (another thing that is always a task for me).
Overall, the new iPod fit my goal of storing all my media on one device, but also surprised me with a number of small fixes and improvements in the user interface. I would recommend anyone who also has a few annoyances with their older firmware or needs a higher capacity to upgrade, and with current iPods still worth a lot of money, the upgrade shouldn't be nearly as costly as the initial purchase.
Full Disclaimer: I was an employee of Apple Inc., but I am not one currently.
 until a month ago, I had been using a 5th generation 60 GB iPod video. It served all the purposes I needed it to, except that I had over 60 gigs of music alone, and I wanted to store photos and videos on the iPod as well. When I had the money to buy a higher capacity iPod, I sold my iPod Video right before Apple's annual World Wide Developer Conference (WWDC), hoping that a new iPod might be announced at the event. No new iPod was announced, but I had already sold my Video, so I went out and bought a new 160 GB iPod Classic.
What I was expecting was nothing more than my old iPod with a higher capacity. What I got was a lot more than that. The new iPod offers a slew of small touches, both on the hardware and on the firmware running on the device.
The
 advantages on the hardware side are that the screen is brighter and crisper, the battery life is more than twice as long, and the iPod still manages to stay the same size while more than doubling capacity. On my older iPod Video, the screen had a high enough resolution to display the important items, but the newer screen is both brighter and higher resolution, allowing more information to be displayed on the screen at once. As for battery life, my Video stopped at around 12 hours of playing music, but the new Classic will play it for 30 hours. On top of all that, the dimensions of the devices are almost identical, other than the shape of the front edge is shaped slightly differently.
The
 firmware improvements include a better method of displaying the time in the top menu bar, artist names listed under song names while viewing playlists, and an overall sleeker and more appealing look and navigation through my media. On the Video, the top menu bar was usually taken by the name of the playlist or navigation menu you were in, so trying to check the time in the top bar was a time consuming process. The newer firmware takes advantage of the higher resolution screen and displays the time constantly, regardless of what menu you're in. Another slight annoyance I had with the Video was that many artists have songs with the same name (for example, I have 9 different songs, all called "beautiful" and all by different artists). If these songs were in a playlist, I wasn't sure which of the songs I was choosing. Again taking advantage of the higher resolution display, the Classic displays the artist of each song when looking at a playlist. Lastly, the Classic really utilizes album art that is tied to the songs in my library. At each music menu, the menu options are on the left side of the screen while albums that are in the current selection are faded in and out on the right. This often provides me with something random but good to start listening to and makes for an interesting way to pick music (another thing that is always a task for me).
Overall, the new iPod fit my goal of storing all my media on one device, but also surprised me with a number of small fixes and improvements in the user interface. I would recommend anyone who also has a few annoyances with their older firmware or needs a higher capacity to upgrade, and with current iPods still worth a lot of money, the upgrade shouldn't be nearly as costly as the initial purchase.
Full Disclaimer: I was an employee of Apple Inc., but I am not one currently.
Monday, June 23, 2008
TechTelic Tip: More Finder Keyboard Shortcuts

I love discovering new neat things on my mac, and today I stumbled upon OS X's built in clipboard switcher which allows for multiple copies and pastes to be saved and accessed at any time.
You can access the clipboard switcher by adding the shift key to the normal cmd+c or cmd+v keyboard shortcuts. To add a new clipboard entry to the manager, just select the text you want to copy and press cmd+shift+c. To paste, select where you want the text/image to be pasted and then double click which copy you would like pasted.
A few other finder keyboard shortcuts that I also discovered today are:
instant access to the Applications folder: cmd+shift+A
instant access to the Utilities folder: cmd+shift+U
instant access to the Desktop: cmd+shift+D
and my personal favorite,
instant google search of selected text: cmd+shift+L
UPDATE:
A recent machints.com article adds that you can also drag selected text to the safari icon in your dock to perform an instant google search
http://www.macosxhints.com/article.php?story=20080619191307294
Tuesday, June 10, 2008
TechTelic Tip: Quicktime Keyboard Shortcuts

I read a good dozen or more blogs per day, so I have to use an RSS reader such as google reader to keep track of what's news. With google reader, you can scan through new articles with the j and k keys, j to go forward one article, and k to back up to the previous one.
This evening I was reading through an article in google reader while downloading a song in the background. When the song finished downloading, it automatically launched quicktime to play the song right as I was pressing the j key to go to the next article. The song started, but something wasn't quite right - it was playing in reverse!
I quickly discovered there are many other keys that can be used to control quicktime. On a quick side note, I do use quicktime pro, so some of these keys may only work if you have the upgrade.
k = pause
l = play
j = play in reverse
you can also use keyboard controls for minor edits (definitely quicktime pro only)
i = set an in point
o = set an out point
right arrow = 1/4 second forward
left arrow = 1/4 second backwards
You can also use the command key + right or left arrows to play forwards or backwards respectively. That reminds me of one of my favorite things about macs; there are a lot of "right" ways to do things. Some may be easier to execute, others easier to remember, and others still that are just the most logical. Part of my work for apple included training individuals in iMovie and other applications, and one of the most common comments was something like, "I got it to work this way, but is that the right way to do it?" My response was always some variant of that it may not have been the most efficient way to get it done, but if it's done and it's the way you want it, you did it correctly. Alright, end of random mac fanboyism.

There are also many many other keyboard shortcuts that aren't fully spelled out in the finder, but there is documentation on apple's website for full finder keyboard shortcuts as well as lists for individual application's keyboard shortcuts. One last note, iTunes visualizers also have keyboard commands, check 'em out!
Tuesday, June 3, 2008
TechTelic Tip: Make you computer sleep more quickly

When you shut the lid of a mac notebook, the display immediately turns off, but the computer does not instantly go to sleep. This is because the machine is preparing for what's called "safe sleep."
Safe sleep allows you to switch out to a spare battery while the machine is asleep without having to shut down or lose your place in whatever you're doing. The way this works is, when a computer goes to sleep, it powers down everything except for the RAM.
The RAM holds information about anything and everything currently running on your machine so that when you wake it back up, you can continue right back where you left off. The RAM doesn't take much energy to run, but requires battery power to remember what was running when it was put to sleep.
The difference with safe sleep is that the computer first writes the contents of your RAM onto the hard drive, which does not require power to store data. The problem this causes is that your machine can take up to 30 seconds to go to sleep during this process, and if during this time you throw the machine into your backpack or laptop case, you can rattle the (still running) hard drive enough to crash it. I made it a habit to wait until I saw the sleep light going on and off before putting the machine away so as to avoid causing damage to the hard drive, but because I don't even own a spare battery, safe sleep is not necessary for me.
To avoid having to wait the half a minute or so that it takes to put the machine into safe sleep, there is a terminal command to disable the feature.
$ sudo pmset -a hibernatemode 0
$ sudo nvram "use-nvramrc?"=false
$ sudo pmset -a hibernatemode 0
$ sudo nvram "use-nvramrc?"=false
Once those commands have been issued, you will need to reboot your machine for the new commands to take effect. Once that's done, you will notice that your machine sleeps significantly more quickly. However, if you experience a power loss, whatever you were working on will be erased. If you do decide you need safe sleep back again, you can issue these commands to reverse it.
$ sudo pmset -a hibernatemode 3
$ sudo nvram "use-nvramrc?"=true
$ sudo nvram "use-nvramrc?"=true
Saturday, May 31, 2008
Laptop Coolers - Which to Use and Why
My current computer is a Macbook Pro 2.33 GHz Core2Duo, with 3GB Ram and a 200GB HD. There is little I would change about my laptop, other than it tends to get very warm when used on my lap, even if for just a short period. I looked into a few different solutions to remedy this problem and found two basic types of “lap coolers” that are designed to lessen the heat transferred from the laptop to your lap.
The first type is a passive (no fan) cooler like the iLap made by Rain Design. These are generally very lightweight and basically give the computer a way to make its own internal fans more efficient by allowing better airflow underneath and around the computer.
The second type has an active cooling design. This means it has built in fans that can either pull the warm air from the bottom of the computer, or push room temperature air up to the computer. The active cooler I tested was a SwissGear Glacier notebook cooler. Either active or passive, the cooler sits between you and the computer and attempts to keep the machine cool, and the internal fans quiet.

I did a bit of testing to see how effective each type of cooler can be. I also used my computer directly on my lap as a control - to see how effective a cooler is in the first place. I did each test in the same room with the same external temperature (~72ºF) and used iStat pro to measure the temperatures and fan speeds during each test.
First, I ran my computer directly on my lap with an iTunes visualizer in a window with iChat, Mail, and Safari running under normal use. The fans in my machine quickly spun up from the "idle" 2000 RPM to 6000 RPM (the maximum, and a very loud speed) and my CPU settled out between 149ºF-153ºF within about five minutes. This made for a very loud computer under a relatively light load and the computer got uncomfortably warm on my lap after only a few more minutes of this.
I allowed the computer to cool back down and let the fans rest at 2000 RPM for five minutes before I tested the machine with the SwissGear notebook cooler ($35).
This is an active cooler with built in fans that pull warm air away from the bottom of the machine. During my testing with this cooler, the internal fans in my MacBook spun up to about 3800-4200 RPM (significantly less noisy than the full 6000 RPM) and the CPU settled a bit lower than it had without the cooler at 147º. The cooler definitely cut down on overall noise, even though its fans are spinning constantly. There are a couple downsides to this solution. First is that the fans on the SwissGear still put a bit of heat on my lap, but not nearly as much as the notebook was when it was directly on my lap. Second is that the fans in the cooler require the use of a USB port to work which is not only annoying to have to plug in, but also drains the battery in your notebook that much more quickly.

I again let the computer rest and cool back down to normal temperatures before beginning testing with the RainDesign iLap ($50).
The iLap is a passive cooler that elevates the computer and keeps the heat off your lap entirely, but has no fans to aid the internal fans in cooling the computer. Under the same conditions, the machine stopped at the highest temperature of the three tests at 153º-156º. The fans stayed around 4100 RPM, but fluctuated up to 4400 RPM at times. The fan speeds were higher than they were with the SwissGear cooler, but because there aren't any additional fans on the iLap, it actually ended up being quieter overall. In addition to it being less noisy than the other two options, the iLap successfully keeps all of the computer's heat off my lap and has built in pads to make it even more comfortable to use over long periods.

Conclusion: If keeping your computer's temperature low is your highest priority, the SwissGear or another active cooler with built in fans will do the best job, albeit at the cost of a slightly more noisy machine with one less USB port. If comfort and noise reduction is most important, a simple passive cooler like the iLap will provide the best solution.
Do you have a favorite notebook cooler or do you just plop the laptop right into your lap? Post in the comments!
The first type is a passive (no fan) cooler like the iLap made by Rain Design. These are generally very lightweight and basically give the computer a way to make its own internal fans more efficient by allowing better airflow underneath and around the computer.
The second type has an active cooling design. This means it has built in fans that can either pull the warm air from the bottom of the computer, or push room temperature air up to the computer. The active cooler I tested was a SwissGear Glacier notebook cooler. Either active or passive, the cooler sits between you and the computer and attempts to keep the machine cool, and the internal fans quiet.

I did a bit of testing to see how effective each type of cooler can be. I also used my computer directly on my lap as a control - to see how effective a cooler is in the first place. I did each test in the same room with the same external temperature (~72ºF) and used iStat pro to measure the temperatures and fan speeds during each test.
First, I ran my computer directly on my lap with an iTunes visualizer in a window with iChat, Mail, and Safari running under normal use. The fans in my machine quickly spun up from the "idle" 2000 RPM to 6000 RPM (the maximum, and a very loud speed) and my CPU settled out between 149ºF-153ºF within about five minutes. This made for a very loud computer under a relatively light load and the computer got uncomfortably warm on my lap after only a few more minutes of this.
I
 allowed the computer to cool back down and let the fans rest at 2000 RPM for five minutes before I tested the machine with the SwissGear notebook cooler ($35).
 This is an active cooler with built in fans that pull warm air away from the bottom of the machine. During my testing with this cooler, the internal fans in my MacBook spun up to about 3800-4200 RPM (significantly less noisy than the full 6000 RPM) and the CPU settled a bit lower than it had without the cooler at 147º. The cooler definitely cut down on overall noise, even though its fans are spinning constantly. There are a couple downsides to this solution. First is that the fans on the SwissGear still put a bit of heat on my lap, but not nearly as much as the notebook was when it was directly on my lap. Second is that the fans in the cooler require the use of a USB port to work which is not only annoying to have to plug in, but also drains the battery in your notebook that much more quickly.

I again let the computer rest and cool back down to normal temperatures before beginning testing with the RainDesign iLap ($50).
The iLap is a passive cooler that elevates the computer and keeps the heat off your lap entirely, but has no fans to aid the internal fans in cooling the computer. Under the same conditions, the machine stopped at the highest temperature of the three tests at 153º-156º. The fans stayed around 4100 RPM, but fluctuated up to 4400 RPM at times. The fan speeds were higher than they were with the SwissGear cooler, but because there aren't any additional fans on the iLap, it actually ended up being quieter overall. In addition to it being less noisy than the other two options, the iLap successfully keeps all of the computer's heat off my lap and has built in pads to make it even more comfortable to use over long periods.

Conclusion: If keeping your computer's temperature low is your highest priority, the SwissGear or another active cooler with built in fans will do the best job, albeit at the cost of a slightly more noisy machine with one less USB port. If comfort and noise reduction is most important, a simple passive cooler like the iLap will provide the best solution.
Do you have a favorite notebook cooler or do you just plop the laptop right into your lap? Post in the comments!
Wednesday, May 28, 2008
The Return to The Big Screen
Over Christmas break last semester, my room was broken into and my 23" Apple Cinema Display was stolen along with my roommate, Kent's, Nintendo wii, a DVD player, a Luna iPod speaker system, and a sublime poster. The entirety of my second semester and up until about a week ago, I was using the 15" screen on my MacBook Pro, most of the time propped up on my lap with an iLap notebook stand. This allowed me to relax and sit back in my chair while surfing around and reading blogs, but was a big switch from the 23". With so much less screen real estate, features like Leopard's spaces can really be fully utilized, but at the same time it's nice to be able to visually see more items at a time which can only be accomplished with a larger screen with a higher resolution.

I just got a new 23" ACD just like my previous one, and I found that I actually have come to enjoy the MacBook Pro's screen, not for its size, but for its ability to be in my lap (I know, big surprise that a laptop can go in your lap, but bear with me.) With the 23", I find myself leaning forward in my chair which can get very uncomfortable for my back after a day of leaning over the computers I repair at work. On top of the back issue, my arms have much less support as well because they're unable to rest while I'm going from the keyboard to the mouse and back - an issue non existent on a notebook with the keyboard and trackpad so close together. This has led me to two conclusions. First, a corner desk (which I used from my 6th grade year until just last year before going to college) offers much more arm support. A straight desk can work if the keyboard tray and arms on the chair are both at the exact same height, but otherwise my arms tend to get tired quickly. Second, a notebook with a small barrier or stand between you and the computer makes for a much more comfortable way to use the computer for extended periods of time.
I have also just begun using a swiss gear lap cooler with two USB-powered fans because I've loaned my dad my iLap to see if he agrees on the increased comfort of using a notebook instead of a desk system. I'll post a more detailed comparison between the two laptop cooling solutions when I've had more opportunity to compare them.
As somebody who is on my computer for hours upon hours each day, it is important to find a comfortable and supportive position to use these machines. If you have found a more comfortable position to use your computer, post in the comments.
P.S. After a full month of getting settled in, hopefully I'll be able to keep up with this blog on a more regular basis. I have a list of ideas to write about, and now that I'm fully moved in and have a regular job schedule, I should be able to find time to devote to this blog again!
Monday, April 28, 2008
Stuff I Use: YouControl
There's a great menubar program for mac called YouControl ($30, free 30 day demo), and among many other useful features, there is a pasteboard that creates a menubar menu which allows you to see and select any of the past 5, 10, or however many past clipboard entries you've copied. After you have selected the one you want to paste, there is another menu that pops out that gives the date, time, and application you copied from, and gives you the option to paste in the style it was copied in, or to paste with unformatted text. This is infinitely useful for me because it not only allows me to paste things that have been written over in the current clipboard, but also allows me to paste following the same style I'm already using in a document without having to reformat the style.
The program is a bit resource hungry, and at a price of $30 this may not be the most elegant solution if you only get the pasteboard out of it. However, the other functions of the program are very useful - the ones I use include an iTunes controller, weather forcast, address book, and an enhanced date/time in the menubar.

Friday, April 18, 2008
First Thoughts: Valentine One Radar Detector

Up until recently, I thought radar detectors would only serve to guarantee you a ticket when you got pulled over. I had read multiple articles about how they aren't really that effective, and if you had one mounted to your windshield, a police officer would be almost guaranteed to write you a ticket (as opposed to a warning) if pulled over.
However, after using a Valentine One radar detector, I can honestly say that this is a huge improvement over the next best competitor. As I drove down the highway coming back to school after purchasing one of these units, the detector produced no false alarms, and gave me a good 20-30 seconds of warning if there was a speed trap ahead. This gave me adequate time to double check my speed and ensure I was safe from, as the V1 website calls them, "bogies." While I realize that speed limits are put into place as protection against ourselves, I think speeding within reasonable limits is acceptable. This device helps to be better aware of what is around, while allowing me to concentrate more on driving, rather than trying to search out the next uniform hiding under the bridge.
On top of the highly selective detection hardware that filters out false alarms, the Valentine has one feature that no other offers - arrows. Arrows might not seem very logical for a radar detector, but the device interprets the radar it detects and gives you the direction, strength, and number of radar streams it detects. For example, if you get four simultaneous signals from in front, behind, and to the sides, you can be almost fully assured that you're picking up microwave signals from a grocery store door system or the like. On the other hand, if you get one slowly building signal from ahead, you can be almost guaranteed that you're approaching a speed trap. The inventor of this system has written many articles on the V1 website as to how these signals can be interpreted and what each most likely means.
Overall, the V1 has saved me me from a speed trap on almost every highway trip I've taken since I started using it. If you're one to speed, this is the detector to get, and while the price is steep at an MSRP of $399, used units can be had for around $250 on ebay. The V1 website does a superb job of explaining the unit and how it can be best utilized. Check it out. Here's a link to their store.
Sunday, April 13, 2008
Stuff I Use: Caffeine

I'm not usually one to start my day with a coffee or espresso, but from time to time it can help. Now my mac, on the other hand, seems to get a bit tired and dim the screen after a few minutes of idle time. This is a feature created to save battery life in notebooks and while this aspect is useful at times, the feature becomes very annoying if I'm watching a movie or at work trying to follow a long document. I could go into the preferences and change the settings every time, but it would be simpler if there was, say, a button in my menu bar that I could just click and have my mac stay awake for longer than the 10 minutes it is set to stay awake.
Meet Caffeine, not for you, but for your mac. This bit of freeware by lighthead software is extremely useful for day to day video watching and for extended reading where moving the mouse around every 5 minutes isn't convenient. The most recent update has added a timer so that you can set it to keep your mac awake for anywhere from five minutes to two hours before returning to its normal settings.
If you have a notebook mac and find this useful, you can download your free copy here
Tuesday, April 1, 2008
Stuff I Use: Mail Appetizer

As a compulsive email checker, I tend to have my email client open at all times. Each time it chimes with new mail, I switch over to Apple Mail.app to read whatever I've just received. Unfortunately, half the time the chime ends up being junk mail and I've just stopped whatever I was in the middle of and interrupted my train of thought just to figure that out. The solution for this should be for me to just turn off Mail.app aside from when I'm specifically checking email, but I wanted something more convenient that still fueled my email addiction. I wanted something that would instantly display a small preview of the sender, subject, and content of an email as an "on top" message window. Mail.appetizer is an Mail.app plug-in that does exactly that. The plug-in creates an instant preview of incoming mail after rules (such as the junk mail filter) have been applied. This allows me to ignore spam messages entirely and at the same time fits into my workflow allowing me to see new mail without having to switch from what I'm doing every ten minutes. Regardless of the application I'm in, I'm presented with new mail and given the options to ignore the message for now, mark it as read, or delete it on the spot - all without switching to Mail.app.
This was one of the primary plug-ins that I'd been missing since my switch to Mac OS X 10.5, but a recent upgrade by the developers has enabled Leopard use and my productivity has increased as a result. If you use Apple Mail, give it a try!
Monday, March 31, 2008
My Other Blog
I like to share interesting stuff I find online with friends and family and usually do so by email. This works for most items because certain things pertain to certain people where others probably wouldn't be the least bit interested. However, there are other things that I feel like sending out a mass email about, but considering I highly dislike receiving mass emails myself, it would be rather hypocritical for me to send out mass emails to others. Tonight, I found a really interesting article that I wanted to share with everyone, so I'm starting a blog just for my random thoughts and tidbits I find online.
Wednesday, March 26, 2008
A Quick Suggestion: Backup!

More than once a week I find myself listening to the lower left palm rest of a friend's Macbook or Macbook Pro. I'm listening for grinding, whirring, or the fatal click, click, silence that signifies the death of yet another 2.5" notebook hard drive. Then comes the fun part - I get to tell the owner that the reason their computer has stopped working is that their hard drive has crashed, and while it will probably be covered under warranty, all their data- the six-page essay they've been working on for a week, all their digital photos, their (pirated) movies, and illegal music downloads are all gone. Forever.
This is certainly not just a Mac problem, and is actually just as common in PC notebooks. However, all your data can be secured and backed up extraordinarily easily. Now this is not something to put on your todo list. This is not something to do next week, or whenever you get around to it. This is something to do today. You should be making backups of your important data weekly at the least. There are many utilities that can help you with this, but before we get into those, we need to find a place to store those backups that will be made.
There are two options for this: Online, or an external hard drive.
Online options are relatively limited and tend to cost a bit more than external hard drive solutions. However, in return for this extra expense, your backups are available to you anywhere you have an internet connection, and there's no way for this data to be lost if there's a catastrophe such as a fire where everything could be destroyed. The top three options here are Amazon's S3 service, Box.net and Apple's .Mac service.
Amazon's service is unlimited, but charges you for putting data on the server, removing it, and storing it. This is infinitely secure, very automated, and has the highest capacity of any online service, but charges you for it accordingly. Pricing information is about half way down on the description page linked above.
Box.net gets you one gig for free, with 5 or 15 gigabyte services available for a fee. There is no automation like there is with both the Amazon and .Mac services, but if you're looking to backup only the essentials, the free gig is better than nothing.
Apple's .Mac option gives you many many things in addition to online storage with automated backups, but gives you 10 gigs online with fully integrated functionality for $100/year ($8.33/month)
Moving away from online options, external hard drives are getting very affordable, and with all the available backup solutions, there's really no reason not to pick one of these up to save your data. Once you have an external hard drive (links to hard drive deals at the bottom), here are a few options for back up utilities: Time Machine, Carbon Copy Cloner, and SuperDuper
My favorite: Time Machine. Mac OSX 10.5 comes with this feature built in and setup couldn't be simpler. You plug in your hard drive, your computer asks you if you want to use this hard drive for backup, you say yes, and you're done. Your computer backs up hourly in the background and keeps those hourly backups for 24 hours. You accidentally deleted an email you got this morning? No problem, Time Machine has a copy. Time Machine saves the hourly backups for the past 24 hours, daily backups for the past month, and weekly backups for everything older than a month. Price is free with Leopard, or $129 for the upgrade
My second favorite: Carbon Copy Cloner. Bombich software released version 3.1 of this fantastic software just a few days ago. The program creates a carbon copy of your hard drive onto an external one. If your hard drive crashes entirely, hold down the option key and boot from the external straight into the system just the way you left it. Easy, simple, and best of all, free! (Donations accepted)
A third option I've also used is SuperDuper. This is by far the most customizable, but with that comes additional setup time and effort that I just don't like to spend. If you have specific files or intervals you'd like to backup by, this is the option for you. $27.95
Free trials are available for all of the above, but no matter which works best for you, don't wait! Spend the small investment of time and/or money to save your data!
Wednesday, March 19, 2008
The Point & Shoot Convenience

Now that I've written a few articles explaining the many benefits of a DSLR camera, there is one thing that DSLRs are not quite up to snuff on, and that one thing is compact size. If I have my Nikon D80 DSLR with me, it is because I have specifically blocked out a portion of time to go shoot photos. I lug books, paper, notebooks, my MacBook Pro, and anything else I need for classes around every day. I just don't use my camera enough to justify carrying it around 24/7. However, point and shoot cameras have come a long way in just a few years, and while they can't match the quality of a nice DSLR, when that moment comes that you really wish you had your camera, a pocket-sized point and shoot is far better than nothing.
There are many nice point and shoot style cameras out there, and I've used many different types and styles. In general, Nikon, Fuji, and Canon are the leaders, while olympus goes for a certain niche of the market (weatherproof/waterproof). Sony, Samsung and Panasonic make very decent cameras as well, but my personal favorites are Nikon and Canon. In my experience, Sony cams tend to lack accurate color, Samsung makes their cameras out of a brushed nickel, making them very durable, but too heavy, and Panasonic's Lumix line tends to lack build quality and feel cheap in the hand.
The most important things in a point and shoot are:
- Small size - if you can't fit it comfortably in your pocket/purse, you won't carry it.
- Speed - if your son is about to jump from the swing set, you have about half a second to turn your camera on and take that photo.
- Image stabilization - When he jumps from that swing, you might want to be able to make out that it is indeed your son jumping, not just an ambiguous blur!
Nikons and Canons will give these features, with the highest quality output, at the best price for the quality.
My current point and shoot is a Canon SD800IS. This camera has survived many scrapes and falls, and sits in my pocket nearly every moment I'm not at home. The camera features image stabilization, a wide angle lens, and packs all the quality I need into the photos I take with it. I absolutely love my 800, but it can be a bit large for some users. I would recommend the SD1000 which packs the same photo quality without the wide angle lens in a much smaller package.
Here's a link to a small gallery with some pictures taken by my SD800
Sunday, March 16, 2008
GPS - Different Day Different Route
 The producers of my first GPS unit, TomTom, have recently released a new couple units (the GO 730 and GO 930) with a very interesting new feature called IQ Routes. The feature uses data collected from other TomTom GPS units over the past year to determine the fastest route from point A to point B based on what day it is. This could prove to be a very useful feature, although many issues could crop up such as days with heavy snow or traffic wrecks, but the more pressing issue with these units is the realization that TomTom is not only able to track an individual GPS unit wherever it is, but is collecting and analyzing this data on an individual basis. For privacy nuts like myself, this causes concerns as to who can access this data and how closely tied it is with a single individual. Hypothetically speaking, if one were to register a GPS unit with its manufacturer, anyone with access to the database could track where your GPS (and presumably you) are at any given moment.
A disturbing thought to say the least. Is my concern on this a bit much - or does the ability of GPS producers to follow units present a true privacy issue?
Saturday, March 8, 2008
Hiatus
Well, the past week has been filled with midterm exams and essays and the next week is spring break, so as of 6:00 AM tomorrow morning I'll be off to Cancun for a nice week of good times with the family. I'll be back and posting about a few things I've checked out recently as soon as I get back, but for now I need to get packing and get some sleep!
In the meantime, feel free to check out a couple things I'll be writing on upon my return:
I'll be back soon!
Monday, March 3, 2008
How To: Use Your DSLR Camera Settings
The article on the basics of DSLR controls explained how your camera works internally. This article is a followup to explain how to manipulate these settings on your DSLR.
Now you have an idea of how the settings work, but using them is the only way to really get a handle on how each setting really affects your pictures. I'll explain how to use these settings on both the Nikon D-80 and the Canon E0S Digital Rebel XTi.
As you can see below, these two cameras have very different looking mode dials, but in reality, both serve the same general purposes. The Nikon is on top and the Cannon on bottom.

 Each camera has the same basic modes: Auto (green on both), P (Program Mode), S/Tv (shutter priority/Time Value), A/Av (Aperture Priority/Aperture Value), M (Manual) and a slew of situation modes.

 Each camera has the same basic modes: Auto (green on both), P (Program Mode), S/Tv (shutter priority/Time Value), A/Av (Aperture Priority/Aperture Value), M (Manual) and a slew of situation modes.
I recommend using auto and the situation modes if you're just starting out. These will help you identify what looks best in different situations and once you have a hold on what you like best, you can start to manually set your camera to match those settings in other situations.
Auto
You point your camera and press the button - the camera attempts to figure out everything to end up with a balanced image.
Program
This mode is very helpful for taking a little bit of control, while allowing the camera to still have its say in what it thinks will make for a balanced photo. When you move your camera's dial on this mode, both shutter and aperture will settings will change to allow the correct amount of light into the lens, but the camera will limit you to settings that are appropriate to avoid over or underexposing the image. ISO is set manually in this mode as well.
Shutter Priority/Time Value
This mode allows you to adjust the shutter speed manually and allow the camera to choose an aperture that allows enough light in for the shutter speed and ISO you have set. A high shutter speed could be used to take a picture of a race car traveling 100mph, and make it appear to be completely stationary in the middle of the track, or maybe more practically to take a picture of your dog running around in the back yard without the slightest hint of blur.
Aperture Priority/Aperture Value
In the same way that Shutter Priority allows you to choose a shutter speed and the camera picks an appropriate aperture, this mode allows you to choose an aperture and ISO of your choice and uses the best shutter speed based on the settings you've chosen. An example of how this could be used would be if you're wanting to take a family portrait and want to make sure everyone is in focus, you would set your aperture at a high f-stop.
Manual
Pretty literal - you set everything. The ISO, the shutter, the aperture, and a plethora of other things can be set in this mode.
Well, that covers most of the basics for getting started with taking better and more creative digital photos, but that's just the point! These are the basics and so much more can be learned by looking at others' photography for inspiration and finding your own style to shoot - so get out and start taking pictures!
Sunday, March 2, 2008
The New eHarmony: Apple Stores

A girl I know just came and asked me if I ever got hit on while working at the Apple store -granted, I can be pretty oblivious at times, but I told her that I honestly have no recollections of getting hit on by a customer while I worked there. I asked her what brought this question on, and apparently Cosmopolitan magazine just listed Apple stores on their top places to pick up guys. Their rationale is that "Most guys are natural gadget lovers, and with sales of iPods and MacBooks skyrocketing, more men than ever are stopping by Apple boutiques. The vibe at the stores is conducive to man meeting too: You can check your email among cuties, take a free workshop on anything from Photoshop to podcasting (a great opportunity to strike up a conversation), or just survey the, ahem, good-looking merchandise."
So for all you single girls (or desperate guys - kidding, of course) get to an Apple store asap!
Shoot Better Photos: Basics of DSLR Controls
When a photographer starts talking about shooting photos, words and acronyms like Shutter Speed, Aperture, ISO, MegaPixel, White Balance, or AF Area can be talked about. The problem is that a lot of people have no idea what these terms mean. Books have been filled explaining these ideas, so I'll try and keep this entry as filled with information as possible, without overwhelming everybody with too much all at once. This article will go over the basics of what these terms mean and how they can be used, and I will follow up on these controls work on your DSLR in another article.
On a side note, if you have a point and shoot camera (anything pocket sized), these controls are generally not available on cameras that size.
 If too much light gets in, you get an "overexposed" picture with lots of white and washed out details.

However the opposite is also true. If too little light gets in, the image is "underexposed" with black areas and not much definition.

Luckily, your camera is smart enough to balance these settings to get your picture correctly exposed almost every time. As you can see here, the camera slightly overexposed this picture on automatic mode. The wall above the speaker is washed out with no definition - this is what can be avoided using manual settings.
Let's start at the beginning - shutter speed, aperture, and ISO. These three settings control how much light gets into the camera and how that light is received by the camera's sensor. In order to take a balanced picture, the amount of light that reaches the camera's sensor has to be just right.
When a picture is taken, the lens opens up for a specific amount of time at a specific width. This allows just the right amount of light to get into the camera's sensor. This light reaching the sensor is what produces an image.
 If too much light gets in, you get an "overexposed" picture with lots of white and washed out details.
However the opposite is also true. If too little light gets in, the image is "underexposed" with black areas and not much definition.

Luckily, your camera is smart enough to balance these settings to get your picture correctly exposed almost every time. As you can see here, the camera slightly overexposed this picture on automatic mode. The wall above the speaker is washed out with no definition - this is what can be avoided using manual settings.
Shutter Speed
Shutter speed is a measure of how long the lens stays open. A faster shutter speed, 1/100 of a second or higher, will allow you to "freeze frame" whatever is in front of you, but lets less light into the camera. In an indoor setting, this will usually cause the image to be underexposed without the aid of flash. A longer shutter speed will allow more light into the camera, but can cause motion blur. A tripod can be infinitely helpful to stabilize the camera and prevent blurring. A good rule of thumb for handheld shots is about 1/30 of a second to keep from blurring.
Aperture
Aperture is sort of like the pupil of your eye in that it opens wider as light decreases to let in more available light. If you have a quick shutter speed, a wider opening in the aperture will allow more light to enter the lens. The diameter of an aperture is measured in f-stops. A lower f-stop number widens the aperture and allows more light onto the camera sensor. Higher f-stop numbers make the camera's aperture smaller so less light hits the sensor. Aperture can also have an effect on the depth of field in the image. Higher f-stops (smaller diameter, less light getting to the sensor) allow more of an image to be in focus, and if you have enough light, this is usually a good idea to make sure your subject is in the best focus. Lower f-stops allow for a very cool isolation of your subject by blurring out the details of anything in front or behind it.
These two concepts are very interrelated in that the faster the shutter speed, the larger the opening of the lens and vice versa.
ISO
So now that we can control the amount of light that gets into the camera which is very helpful if we have an ideal amount of light wherever we're shooting. However, we live in the real world and shoot pictures in many places where the lighting is far from perfect. For these situations, we can use ISO to control the camera sensor's sensitivity to light. ISO 100 is the norm for outdoor shooting and will offer superb color and image rendering. Higher ISO's will allow brighter pictures with less light, but this comes at the expense of image quality.
If you're new to all this, hopefully I haven't caused your brain to explode quite yet! Just keep in mind that the best way to learn about your camera and how setting work is to just go out and shoot photos. Start to play with some of the settings and see if you can make any cool effects, and if all else fails, your camera has a manual that will help explain these settings in more detail.
Good luck, and happy shooting!
Friday, February 29, 2008
Shoot Better Photos: Basics of Composition
There are a million ways to take a picture, and thousands of different cameras to take it with. However, regardless of whether you're shooting with an instant polaroid (which they're about to stop making film for by the way) or the newest Nikon D3 DSLR, there are a few basic things to keep in mind that will make for better pictures almost every time. These certainly are not "rules" that must be followed in order to take professional looking pictures, but can help make good pictures into great pictures.

 When you talk with someone, your gaze is generally focused on one eye or the other, which attracts your eyes to the same locations in photos. This causes a centered subject to be more like the nose of the picture - possibly interesting but not what we naturally look at the most.


If you're in a position to get closer than normal, do it. If you can get a low angle, go for it! These types of ideas help to add an immense amount of variety to your photos and can create patterns like in the picture or the right, or something unique such as the lens flare in the image below it. This is where the most interesting photos can come from, and this is where your "eye" can emerge giving your photography its own style.
The main idea is a bit difficult to master, because most people who are best at it were born with it. Photographers refer to it as having "an eye" for a good looking picture. That is to say that one person can take a picture of something, and another person with the exact same conditions can take a far superior picture just by thinking outside the norms of photography. The key to an awesome photograph is to make an interesting one. If every picture was taken at eye level with the subject in the center, after the first few pics most people would get bored and stop looking. However, if you can incorporate variety and interesting subjects into your shooting, you'll end up with better pictures.
There are three basic things to help incorporate variety into your photos, and to help develop "an eye" for what a good picture might be.
Framing

The first is to frame your pictures while you're taking them. If you have picture or painting on the wall and you put a frame on it, it looks more classy - the same thing applies to a picture.
In the picture to the right, instead of zooming in and getting a close up of the subject, I used surrounding bushes to make for a more interesting picture. This makes the picture more interesting to look at without distracting too much from the main subject.
Thirds
The second concept is called the rule of thirds. The best thing about this is that it can be implemented into photos you have already taken by cropping. The idea here is to mentally split your photo into thirds, both horizontally and vertically, and have the subject of your pic at one of the intersections of these thirds. The reason for this is that the human face is constructed in thirds, with the eyes at the top intersection of the left and right third.
 When you talk with someone, your gaze is generally focused on one eye or the other, which attracts your eyes to the same locations in photos. This causes a centered subject to be more like the nose of the picture - possibly interesting but not what we naturally look at the most.
This photo uses the rule of thirds in two different areas. The first is the entire left wall of the museum follows very closely to the split of the left third from the rest of the image. This makes the viewer's eye follow the wall and with the color differences from bottom to top, the image is given a unique effect. The second area where the rule of thirds is applied is the text "art museum" which falls into the lower right third of the picture, attracting eyes there as well.
Perspective
The final tip is to have an interesting perspective. If your camera has a macro mode, try it out. If you're shooting at eye level, angle your shot to make something in your picture more interesting.


If you're in a position to get closer than normal, do it. If you can get a low angle, go for it! These types of ideas help to add an immense amount of variety to your photos and can create patterns like in the picture or the right, or something unique such as the lens flare in the image below it. This is where the most interesting photos can come from, and this is where your "eye" can emerge giving your photography its own style.
Disclaimer: I am not a professional photographer or even pretending to be one - these tips have helped me take better pictures and hopefully can help you do the same.
Wednesday, February 27, 2008
Advice Whore

As someone who is more tech-savy than not, I seem to be the go-to-guy for most of my friends and family to be whored out for tech advice. Granted - I think about tech stuff most of my day anyways, so I don't really mind, but it's surprising how many of these questions and problems could be avoided by doing two basic things.
First: Get a Mac.
Now I know there's that whole conversation about Mac compatibility with Windows and, more importantly to most people, familiarity with PC's that PC users bring up as reasons not to switch to mac. To this I respond, Macs can run Windows.
Now that a PC has no advantages over a Mac, I should probably try and persuade you with the features Mac OSX has that XP and Vista don't, but more importantly than what the Mac OS has, is what it doesn't have. On a Mac, you never have to worry about viruses, malware, or spyware - oh and you never have to defrag the hard drive either. The bottom line is that, as it stands right now, Macs require less general maintenance than PCs do.
Second: Backup, backup, backup!
I've been accused of making people cry because I'm the one who has to tell them their hard drive has crashed. To explain how all the pictures, videos, and music that a person has collected over the years has just been blinked out of existence sucks, but this situation is easily avoidable.
You know that Mac I just told you to use? If you plug an external hard drive into it, the computer will ask if you'd like to use the hard drive as a backup. You click yes, and you are forever safe from losing all your data.
Macs are getting more and more affordable. Here is Apple's discount and refurb page.
Cheap External Hard Drives Galore
... and a whole website devoted to affordable hard drives
If you have tech questions (especially Mac ones) feel free to sound off in the comments.
If you have tech questions (especially Mac ones) feel free to sound off in the comments.
Subscribe to:
Posts (Atom)
